Simple Hard Cider
Originally written 11-01-2001 for another websiteIt's fall again, time to reap what we've sown or at least what our farmer friends have sown. In many parts of the Bay Area this means apples and plenty of them. But what to do with all those apples? Well you could eat them one by one, make some pies, bake a few for dessert, or why not make some delicious hard cider. Hard Cider you ask? Yeppers, it's easy and inexpensive.
The art of cider making can be as simple or as complex as you want. What I'm going to show you is how to make the most simple and consistently good cider. There wont be a lot of fancy equipment, extra steps, or needless technical jargon. Here is what you need to make five gallons of cider.
What you Need
- 5 gallons of apple juice
- 2x 5 gallon food grade containers (fermenters)
- Airlock
- Yeast
- Cleaner
- Sanitizer
- Tubing ~ 4 ft.
- Bottle filler or tube clamp
- Cane Sugar or equivalent (if sparkling cider is desired)
- 48 - 55 12 oz Bottles or equivalent
- Bottle caps
- Bottle capper
Instructions
Ok, here is what you do, get juice, add yeast, and wait! No, seriously that's all there is to it. Ok, well, for those of you who need a little more instruction here are the step by steps.
- Of course the very first thing you'll want to do is to is gather together all the items we've suggested from the list above. If you need more help with a particular item you can click on it to get a pop-up with more information.
- Make sure your apple juice is at room temperature and start preparing your yeast according to the manufacturers directions. If you are using dry yeast now is the time to re-hydrate it, if you use a "smack pack" style yeast you can break the inner seal, and if using a pitchable tube allow to warm to room temp.
- Now you need to wash and sanitize everything that will come into contact with the cider. Thoroughly wash your fermenter and airlock with detergent and rinse well. Sanitize according to your sanitizers instructions. Remember, sanitizers can't sanitize a dirty container.
- Add apple juice to your container making sure to aerate well. Splashing the juice incorporates air into the liquid for the benefit of the yeast.
- Add (pitch) yeast to the fermenter.
- Place lid on container and add airlock with a little water in it.
- Place your container in a spot where the temperature will remain consistently in the mid to high 60's. The ideal temperature will depend on your choice of yeast but all yeasts will work in this range.
- When bubbling in you fermenter has stopped completely, usually in a week or two, you have cider and it's time to bottle! It's very important that you make sure all bubbling has stopped. Bottling still fermenting cider is potentially dangerous. When in doubt wait it out!
- Clean and sanitize your second container and your tubing as you did for your fermenter. If you plan on using a bottle filler you will need to sanitize this as well. You will also need to clean and sanitize your bottles. Bottle caps need only to be sanitized.
- Siphon (rack) your cider to the sanitized container being careful not to splash the cider nor disturb or pick up the layer of yeast on the bottom of your fermenter.
- Now if you want sparkling cider you will need to add 3/4 cup corn sugar to the cider. This is to give the yeast a little extra sugar to produce carbonation. If you like still cider you simply omit the sugar.
- Siphon your cider into the sanitized bottles leaving approx. 1" of headspace at the top of each bottle. Cap and store in a warm place for one or two weeks to allow the yeast time to carbonate then refrigerate.
- Uncap a few bottles and enjoy! Try to keep a few bottles around for ageing. Cider ages well and flavors will blend and mellow over time. A cool, dark, interior closet makes a perfect place to store your cider.
Now Experiment
 Once you've tried making a couple of batches of apple cider you can start to
experiment. How about a subtly refreshing Perry? Perry is made from pear
juice and can be made using the same procedure as above. If you don't
have access to traditional perry pears or their juice you can add a
small amount of grape tannin to give a slight puckering sensation. Or how about flavoring your apple cider with other fruits? Raspberry?
Peach? Cherry?
Once you've tried making a couple of batches of apple cider you can start to
experiment. How about a subtly refreshing Perry? Perry is made from pear
juice and can be made using the same procedure as above. If you don't
have access to traditional perry pears or their juice you can add a
small amount of grape tannin to give a slight puckering sensation. Or how about flavoring your apple cider with other fruits? Raspberry?
Peach? Cherry?
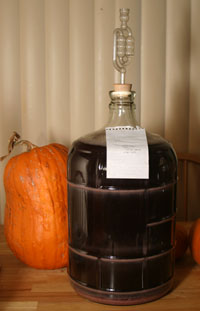
To the left is a three gallon batch of Apple Cherry Cider. It's made from two gallons of apple and a gallon of cherry farm fresh juice. Note, the extra space between the top of the liquid and the top of the container is allowable during primary fermentation only. If you want to age your cider in bulk you want as little air-space as possible between the top of the cider and the bottom of your air lock. You can accomplish this by either racking your cider to a smaller container or topping-up your fermenter with fresh juice.
Whatever you try, it's a good idea to take detailed notes on everything you've done to make your cider so you can repeat it in the future. I keep a note on each fermenter with the details of the batch. Quite handy when your ciders look identical because of only small ingredient changes. I also keep a notebook with notes on every batch I've made. Not only has it helped me keep track of my favorite recipes but it's a valuable resource for when things go wrong.
Where to Shop
1555 Clement
San Francisco CA 94118
415-751-0610
800-513-5196
www.sfbrewcraft.com
975 Detroit Ave. Unit D
Concord CA 94518
1-800-600-0033
www.morebeer.com
info@morebeer.com
Both of these businesses sell everything you need (except juice) to make cider at home. Although I'm not in anyway affiliated with them, I have been a happy customer for many years and do not hesitate to recommend them.